I have used only setState in order to update the view but I faced a problem while I developed my own package grouped expansion tile. The top widget of the package is Expansion Tile. Each expansion tile is draggable and drag target. An expansion tile’s border is highlighted while drag position is on the widget. For that, a new border must be reassigned to the widget which means setState needs to be called. If there are lots of widgets it may take a while to rebuild them. In addition to that, additional variables are needed to keep the current view state because it’s rebuilt. It was a good time to introduce provider.
I created a simple example, so let’s learn how Provider works.
Rebuild only necessary widgets
Why is provider necessary in the first place? When one of the values on a view needs to change, its item needs to be rebuilt. It means that setState needs to be called in the widget or parent widget. If the parent widget is rebuilt all child widgets are rebuilt even if the rebuild is not necessary for some of them. It takes longer to complete to rebuild all widgets than to rebuild only one widget.
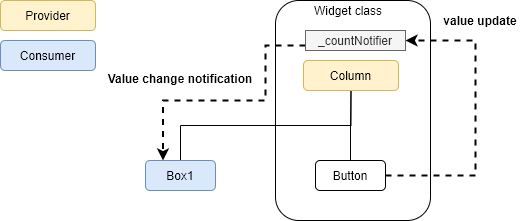
Look at the following image. All widgets are defined in the same class. If the blue button is clicked to update the value of Box1 which is highlighted with red color and setState is called on the event, all widgets listed here are rebuilt. It’s not nice.
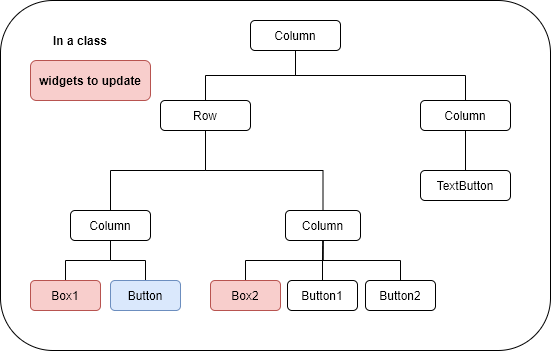
If possible, we want to rebuild only the necessary widget. If we extract Box1 and blue Button into another class together we can rebuild only them. However, it doesn’t work if the target data that the blue button wants to update is used by another widget. If we use InheritedWidget we can solve this problem but it requires boilerplate code. We can easily achieve that if we use Provider.
Sample Widget tree
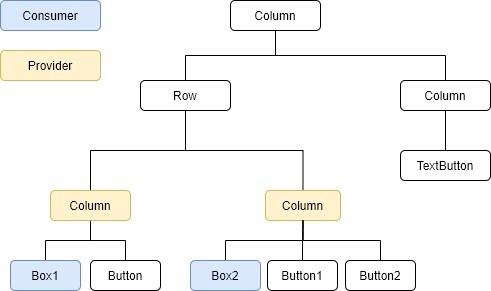
Let’s try to use Provider. I created a simple view.
The widget tree is following.
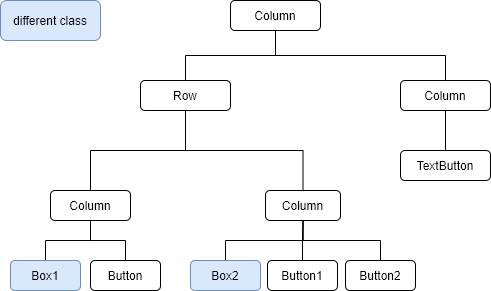
I created Box1 and Box2 widgets. Those are the target widgets that we want to update. We need to have Provider and Consumer. Provider notifies the value change to the consumer when the target value changes. Consumer can recreate their own widgets by using the updated value. Provider must be placed higher place than Consumer. However, if the provider is placed at the top of the tree all widgets can consume the value. To avoid such a case, it should be placed one level above where the value is actually needed. The following image shows the structure.
Extends ChangeNotifier
We need to extend ChangeNotifier class in order to notify the value change. notifyListeners() needs to be called for that. I created the following class which can be used for a primitive data type. When the new value is assigned to the value notifyListeners() is called after comparing the current value. Its check is not mandatory but it’s better to rebuild a widget only when it’s really necessary, isn’t it? If the value is the same it’s not necessary to call notifyListeners().
class Notifier<T> extends ChangeNotifier {
  T _value;
  Notifier(this._value);

  set value(T value) {
    if (_value == value) {
      return;
    }
    _value = value;
    notifyListeners();
  }

  T get value => _value;
}
It can be used like this below.
final Notifier<int> _countNotifier = Notifier<int>(0);Define ChangeNotifierProvider
Let’s put a button which updates the counter value and a box that shows the current value.
Widget _buildColumn1() {
  final button = ElevatedButton(
    onPressed: () {
      _countNotifier.value++;
    },
    child: Icon(Icons.add),
  );

  final column = Column(
    children: [
      button,
      Box1(),
    ],
  );

  return ChangeNotifierProvider.value(
    value: _countNotifier,
    child: column,
  );
}
Button and Box1 are placed on the same level. Therefore, if we place ChangeNotifierProvider for button widget Box1 can’t receive the value change notification. Since ChangeNotifierProvider must be placed one level above, it is used for the column widget.
I used ChangeNotifierProvider.value() because _countNotifier is already defined in the class. If the notifier is created in the function, ChangeNotifierProvider() needs to be used instead. I will show you the code later.
Define Consumer
Next is to define the consumer. Box1 consumes the value. We need to define the builder. The second argument is the value that it wants to use. I declared _rebuildCount in order to check how many times the whole widget is rebuilt.
class Box1 extends StatelessWidget {
  static int _rebuildCount = 0;
  @override
  Widget build(BuildContext context) {
    _rebuildCount++;
    return Consumer<Notifier<int>>(
      builder: (context, count, child) => Container(
        height: 100,
        width: 150,
        child: Center(
          child: Text('Rebuild: $_rebuildCount\n'
              '${count.value.toString()}'),
        ),
        decoration: BoxDecoration(
          border: Border.all(
            color: Colors.blue,
            width: 5,
          ),
        ),
      ),
    );
  }
}
The update direction looks like this.
ChangeNorifier that have more than 2 properties
How can we implement if we need more than two parameters? Just create a class that has two properties.
class _ParamsNotifier extends ChangeNotifier {
  Color _color = Colors.black;
  int _count = 0;

  Color get color => _color;
  set color(Color value) {
    if (_color == value) {
      return;
    }
    _color = value;
    notifyListeners();
  }

  int get count => _count;
  set count(int value) {
    if (_count == value) {
      return;
    }
    _count = value;
    notifyListeners();
  }
}
This time initial values are set in the class. So we don’t need to declare it in the top class. As I mentioned above, ChangeNotifierProvider() can be used in this case instead of ChangeNotifierProvider.value().
Widget _buildColumn2() {
  return ChangeNotifierProvider(
    create: (context) => _ParamsNotifier(),
    child: Column(
      children: [
        ButtonForBox2Counter(),
        ButtonForBox2Color(),
        Box2(),
      ],
    ),
  );
}
The consumer is the same as before.
class ButtonForBox2Counter extends StatelessWidget {
  @override
  Widget build(BuildContext context) {
    return Consumer<_ParamsNotifier>(
      builder: (context, params, child) => ElevatedButton(
        onPressed: () {
          params.count++;
        },
        child: Icon(Icons.add),
      ),
    );
  }
}

class ButtonForBox2Color extends StatelessWidget {
  @override
  Widget build(BuildContext context) {
    return Consumer<_ParamsNotifier>(
      builder: (context, params, child) => ElevatedButton(
        onPressed: () {
          if (params.color == Colors.black) {
            params.color = Colors.red;
          } else {
            params.color = Colors.black;
          }
        },
        child: Icon(Icons.change_circle),
      ),
    );
  }
}
Box2 implementation is the same as Box1.
class Box2 extends StatelessWidget {
  static int _rebuildCount = 0;
  @override
  Widget build(BuildContext context) {
    _rebuildCount++;
    return Consumer<_ParamsNotifier>(
      builder: (context, params, child) => Container(
        height: 100,
        width: 150,
        child: Center(
          child: Text('Rebuild: $_rebuildCount\n'
              '${params.count.toString()}'),
        ),
        decoration: BoxDecoration(
          border: Border.all(
            color: params.color,  // use variable to change the border color
            width: 5,
          ),
        ),
      ),
    );
  }
}
Check the behavior
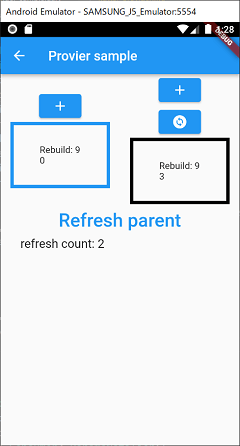
Let’s check the behavior. I placed the following code as well to check the difference.
TextButton(
  onPressed: () => setState(() => count++),
  child: Text(
    "Refresh parent",
    textScaleFactor: 2,
  ),
)
As you can see, the value in the box is incremented when clicking the related button. The border color also changes. Let’s pay attention to Rebuild count. The target widget is rebuilt but the Box1 and Box2 are not rebuilt until setState is called by clicking Refresh parent text button. The values are the same even after calling setState. The value is internally cached.
End
I have known Provider but I haven’t used it for a while but I found it easy and useful. However, I found that the author of Provider developed new module called Reverpod that can be replaced with Provider. I should learn it and replace with Provider because I just started using Provider.
Riverpod is used in the following posts. Check them if you use Riverpod.
Go to my repository if you want to check the complete code.
Comments