To create a beautiful app, a gradient color background could be a good way to implement it. Let’s see how to implement it in Flutter.
Set desired color list to LinearGradient
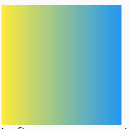
Gradient color can be set in BoxDecoration. We can set a gradient color by specifying gradient property.
Container(
  width: 120,
  height: 120,
  decoration: BoxDecoration(
    gradient: LinearGradient(
      colors: [
        Colors.yellow,
        Colors.blue,
      ],
    ),
  ),
);
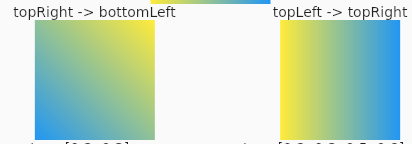
Decide the Direction for the gradient
We can change the direction of the gradient by begin and end.
Container(
  width: 120,
  height: 120,
  decoration: BoxDecoration(
    gradient: LinearGradient(
      colors: [
        Colors.yellow,
        Colors.blue,
      ],
      begin: Alignment.topRight,
      end: Alignment.bottomLeft,
    ),
  ),
);
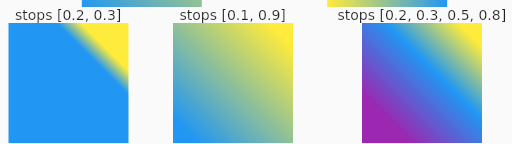
How to decide the gradient range
Specify the position to stops. The range is 0.0 to 1.0.
Container(
  width: 120,
  height: 120,
  decoration: BoxDecoration(
    gradient: LinearGradient(
      colors: [
        Colors.yellow,
        Colors.blue,
      ],
      begin: Alignment.topRight,
      end: Alignment.bottomLeft,
      stops: [0.2, 0.3],
    ),
  ),
);
This means that
- Completely yellow at the position 0% – 20% between the start and end
- Gradient color at the position 20% – 30% between the start and end
- Completely blue at the position 30% – 100% between the start and end
The number of the elements for stops must match the number of colors.
Container(
 width: 120,
 height: 120,
 decoration: BoxDecoration(
   gradient: LinearGradient(
     colors: [
       Colors.yellow,
       Colors.blue,
       Colors.purple,
     ],
     begin: Alignment.topRight,
     end: Alignment.bottomLeft,
     stops: [0.1, 0.4, 0.8],
   ),
 ),
);
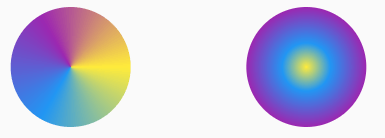
SweepGradient and RadialGradient
Let’s try to use SweepGradient and RadialGradient too.
Row(
  mainAxisAlignment: MainAxisAlignment.spaceEvenly,
  children: [
    Column(
      children: [
        Text("SweepGradient"),
        Container(
          width: 120,
          height: 120,
          decoration: BoxDecoration(
            gradient: SweepGradient(
              colors: [
                Colors.yellow,
                Colors.blue,
                Colors.purple,
              ],
              stops: [0.1, 0.4, 0.8],
            ),
          ),
        ),
      ],
    ),
    Column(
      children: [
        Text("SweepGradient2"),
        Container(
          width: 120,
          height: 120,
          decoration: BoxDecoration(
            gradient: SweepGradient(
              colors: [
                Colors.yellow,
                Colors.blue,
                Colors.purple,
                Colors.yellow,
              ],
            ),
          ),
        ),
      ],
    ),
    Column(
      children: [
        Text("RadialGradient"),
        Container(
          width: 120,
          height: 120,
          decoration: BoxDecoration(
            gradient: RadialGradient(
              colors: [
                Colors.yellow,
                Colors.blue,
                Colors.purple,
              ],
              stops: [0.1, 0.4, 0.8],
            ),
          ),
        ),
      ],
    ),
  ],
);
If we want to use SweepGradient, what we want is I guess the second one that doesn’t have a clear border between the colors. The point here is to specify the same color at first and the end of the elements. Then, it creates the desired gradient color.

Those of them are the perfect fit for circular borders.
Container(
  width: 120,
  height: 120,
  decoration: BoxDecoration(
    borderRadius: BorderRadius.circular(60),
    gradient: SweepGradient(
      colors: [
        Colors.yellow,
        Colors.blue,
        Colors.purple,
        Colors.yellow,
      ],
    ),
  ),
);

Container(
  width: 120,
  height: 120,
  decoration: BoxDecoration(
    borderRadius: BorderRadius.circular(60),
    gradient: RadialGradient(
      colors: [
        Colors.yellow,
        Colors.blue,
        Colors.purple,
      ],
      stops: [0, 0.4, 1],
    ),
  ),
);
Comments