There could be some packages that provide a circular color picker but I wanted to understand how it’s implemented, so I tried to implement it by myself. There might be some people who want to implement it in other languages too. I hope this post helps you there.
Define a circular color box
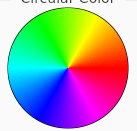
First of all, we need to prepare colors. Prepare all the combinations from RGB.
const List<Color> _colors = [
  Color.fromARGB(255, 255, 0, 0),
  Color.fromARGB(255, 255, 0, 255),
  Color.fromARGB(255, 0, 0, 255),
  Color.fromARGB(255, 0, 255, 255),
  Color.fromARGB(255, 0, 255, 0),
  Color.fromARGB(255, 255, 255, 0),
  Color.fromARGB(255, 255, 0, 0),
];
We want a circular box in a gradient color. The outside an intensive color. The color gets white to the center. Therefore, we don’t need black and white in this color list. The first and last element must be the same color to make it completely gradient. The order is also important to make the other side a complementary color.
Use SweepGradient with the color list.
Widget buildCircularColor(double radius) {
  final diameter = 2 * radius;

  return Container(
    width: diameter,
    height: diameter,
    decoration: BoxDecoration(
      borderRadius: BorderRadius.all(
        Radius.circular(radius),
      ),
      gradient: const SweepGradient(
        colors: _colors,
      ),
      boxShadow: const [
        BoxShadow(
          color: Colors.black,
          spreadRadius: 0.5,
        ),
      ],
    ),
  );
}
The first part looks like this.
Adding gradient to the circle
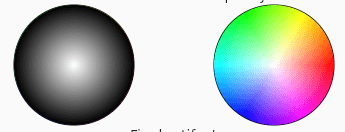
Let’s make the circle gradient. It is completely white at the center position and the circumference is the full intensity color. We can use Stack widget to achieve it.
Widget buildCircularColorWithOpacity(double radius) {
  final diameter = 2 * radius;

  final opacityCircle = Container(
    width: diameter,
    height: diameter,
    decoration: BoxDecoration(
      borderRadius: BorderRadius.all(
        Radius.circular(radius),
      ),
      gradient: const RadialGradient(
        colors: [
          Colors.white,
          Color.fromARGB(0, 255, 255, 255),
        ],
        stops: [0.0, 1.0],
      ),
    ),
  );

  return Stack(
    children: [
      buildCircularColor(radius),
      opacityCircle,
    ],
  );
}
It looks almost the same as before but gradient is RadialGradient. Check this post if you want to know the differences between gradient classes.
The center is white, therefore white must be the first element. The second color is black but it must be completely transparent (alpha value is set to 0). If we set Colors.black there, it will be a grayscale color. By adding transparency, the color at the position is mixed with transparent black.
colors: [
  Colors.white,
  Color.fromARGB(0, 255, 255, 255),
],
Color calculation at the touched position
The next step is to calculate the color at the touched position. If we know the angle from the X-axis, we can calculate the RGB because the circle is split into 6 colors. For example, if the angle is 60 degrees, the color is yellow. From 0 to 60 degrees, only the Green value of RGB increases from 0 to 255. If we know it, the target RGB color can be calculated. However, we don’t have to calculate it since Dart defines HSVColor. It also take the opacity/transparency into account. It’s perfect fit to our case here.
We first need a GestureDetector to detect the touch operation. We pass localPosition for the calculation.
GestureDetector(
  onPanStart: (details) {
    calculateColor(details.localPosition);
  },
  onPanUpdate: (details) {
    calculateColor(details.localPosition);
  },
  onPanEnd: (details) {},
  child: child,
);
This is the calculation.
void calculateColor(Offset position) {
  final distanceXFromCenter = position.dx - radius;
  final distanceYFromCenter = position.dy - radius;

  // distance from center to the touched position (x, y)
  final internalRadius = math.sqrt(
    math.pow(distanceXFromCenter, 2) + math.pow(distanceYFromCenter, 2),
  );

  // The range is -PI to PI.
  final radian = math.atan2(distanceXFromCenter, distanceYFromCenter);
  final degree = convertradianToDegree(radian);

  final saturation = internalRadius >= radius ? 1.0 : internalRadius / radius;

  final correntColor = HSVColor.fromAHSV(1, degree, saturation, 1).toColor();

  // Set color to a variable here
}
Let’s have a look one by one.
To calculate the angle, we need the x and y positions from the center position of the circle. Therefore, the value needs to be subtracted by the radius.
final distanceXFromCenter = position.dx - radius;
final distanceYFromCenter = position.dy - radius;
This calculates the distance from the center position to the touched position.
// distance from center to the touched position (x, y)
final internalRadius = math.sqrt(
  math.pow(distanceXFromCenter, 2) + math.pow(distanceYFromCenter, 2),
);
The radian can be calculated by using Arctan but we need to handle special cases in this case. Instead, we use Arctan2 because it handles them for us.
// The range is -PI to PI.
final radian = math.atan2(distanceXFromCenter, distanceYFromCenter);
final degree = convertradianToDegree(radian);
HSVColor requires an angle of which range is 0 – 360. Therefore, it needs to be calculated in the following way. I asked ChatGTP how to convert radian to angle. -90 is just an adjustment to the circular color that we defined. If we change the order of the color list, the adjustment value changes.
double convertThetaToDegree(double radian) {
  final degree = radian * (180 / math.pi) - 90;
  if (degree < 0) {
    return degree + 360;
  }
  if (degree > 360) {
    return degree % 360;
  }

  return degree;
}
HSVColor requires 0.0 to 1.0 for saturation. When it’s 1.0, the RGB color is used as it is. If it’s 0, it’s white. The closer the position gets to the center position, the whiter the color becomes.
final saturation = internalRadius >= radius ? 1.0 : internalRadius / radius;We already have the necessary variables here. We need to assign them to HSVColor. The first parameter is opacity and the fourth parameter is for brightness. If we want them changeable, we need two sliders for example.
final correntColor = HSVColor.fromAHSV(1, degree, saturation, 1).toColor();We can pick the touched color by assigning the color value to a variable, the target color can be shown on the screen.
If we change opacity and brightness, it changes in the following way.
Go to my GitHub repository if you want to check the complete code.
Comments