It’s important to consider a clean code for software that needs to be maintained. If a class is tangled with many other classes, it’s hard to keep the existing feature without bugs. In addition to that, it takes a longer time to add a new feature with such an unclean code.
How can we implement a Flutter application in clean code? How can we separate UI code from the business logic? Bloc Pattern is one of the solutions that we can apply in a Flutter application. It’s widely applied and there are some packages that help the implementation.
Let’s dig into it with me in this post.
You can clone my repository and check the complete code on your environment if you want. Check my GitHub repository flutter_samples.
I used flutter_bloc package 8.1.2 for the implementation.
Why is it important to separate UI and business logic?
Bloc pattern is one of the solutions to separate UI and the business logic for the clean architecture. Flutter supports a cross-platform. Therefore, the code should be easily adapted to the different environments Module/Desktop/Web without big work.
A different UI needs to be created to provide a good interface depending on the device. If the logic is written in the UI part, the same logic has to be written in all the UI that supports the same feature. It’s hell to change all the places for a feature change.
If the business logic is separated, the code can easily be reused for another UI. Additionally, it makes unit testing easier. We can cover more test cases.
What is Bloc pattern and how does it looks like?
Then, what does Bloc look like actually? Look at the following image.
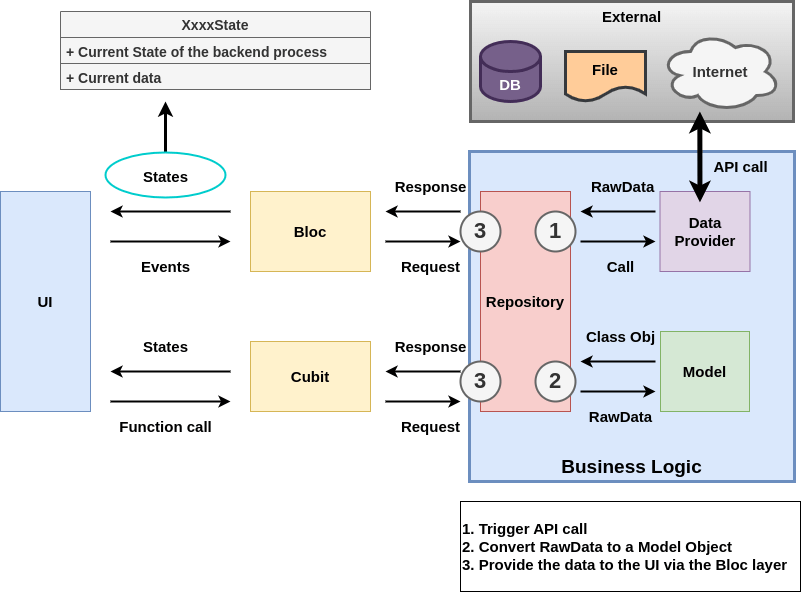
The middle part is the main point for Bloc. There are two main functions called bloc and cubit which will be explained in the next section. When something needs to be done on the UI, it does either a function call or sends an event.
The actual logic is written in the backend part which is in a rectangle Business Logic.
The repository is a facade. The main business logic is written there. The detail implementation should be separated.
Data Provider handles external access like file, DB, REST API call, etc… The data is RawData for example JSON format string or map data. It has to be converted to an object that can be easily used in the UI part.
Model has to define the object. It becomes an interface to the UI part. Therefore, the conversion logic from RawData should be implemented here. UI part relies on the properties. The model has to provide the same properties even though the backend technology changes from a file reading to DB access for example.
By the way, State represents the backend state. If data is stored in a database, state can be like initialized/loading/success/failure. UI part shows the desired widgets depending on the state.
Cubit
Cubit supports a function call. It defines which function to be called from which repository and provides it to the UI. Cubit gives a single or multiple states back to the UI part.
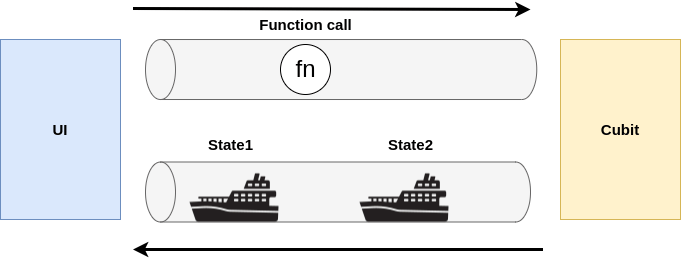
It can be implemented both in sync and async.
Cubit is simpler than Bloc. Use Cubit until Bloc is really needed.
Bloc
UI part sends an event to Bloc. It’s not a function call. It’s always async process.
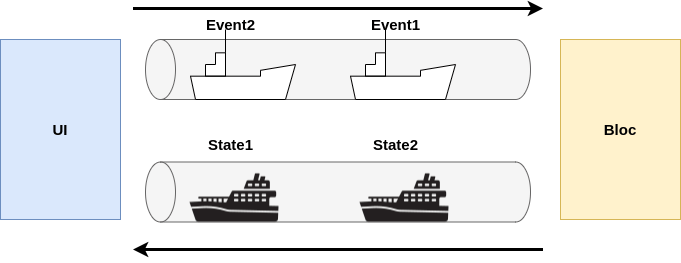
It gives a single or multiple states back to the UI part as a stream.
Since Bloc receives an event from UI part, we can follow the state transitions and the trigger correctly.
Assume that we want to follow the authentication state.
After a user is authorized, it will be unauthorized for some reason. A user might click a button to log out but it might be a timeout. We can’t know why the state changed to unauthorized. Use Bloc if necessary to know the trigger for the state change.
Cubit implementation (Data read from a file)
Let’s create a simple application. It just reads a file and shows the result to the UI. The behavior looks as follows.
UI is not blocked. The different processes can be running asynchronously.
Preparation of the files
The files contain the following content.
# lib/resources/technicalfeeder.json
{
    "id": 1,
    "url": "technicalfeeder.com",
    "author": "Yuto",
    "category": "Programming"
}

# lib/resources/unknown.json
{
    "id": 0,
    "url": "example.com",
    "author": "Unknown person",
    "category": "Undefined"
}
The target files have to be added to the artifacts. Add the following setting to pubspec.yaml.
flutter:
  # To add assets to your application, add an assets section, like this:
  assets:
    - lib/resources/
Model
Let’s define the model first. There are 4 properties in the JSON file but it’s not necessarily needed to define all the properties. Define what you need on the UI part.
It needs to define how to convert the raw data. fromJson is the role here.
class SiteData {
  final int siteId;
  final String url;
  final String author;
  final String category;

  SiteData({
    required this.siteId,
    required this.url,
    required this.author,
    required this.category,
  });

  SiteData.empty()
      : siteId = -1,
        url = "",
        author = "",
        category = "";

  SiteData.fromJson(Map<String, dynamic> json)
      : siteId = json["id"],
        url = json["url"],
        author = json["author"],
        category = json["category"];

  @override
  String toString() {
    return "ID: $siteId\n" + "Author: $author\n" + "URL: $url\n" + "Category: $category";
  }
}
Define other methods too if necessary like empty() or toString().
This is a normal class. No special implementation for Bloc pattern.
State
Let’s define State class next. As mentioned, a state class needs to show the current state of the backend process. Therefore, I defined an enum to show it. The model data has to be added along with it.
import 'package:flutter/material.dart';
import 'package:flutter_samples/bloc_pattern/site_data/site_data.dart';

enum SiteDataStatus {
  initial,
  loading,
  success,
  failure,
}

@immutable
class SiteDataState {
  final SiteDataStatus status;
  final SiteData? siteData;

  const SiteDataState({this.status = SiteDataStatus.initial, this.siteData});

  SiteDataState copyWith({
    SiteDataStatus? status,
    SiteData? siteData,
  }) {
    return SiteDataState(
      status: status ?? this.status,
      siteData: siteData ?? this.siteData,
    );
  }
}
Note that the state should always be immutable. The author answers the reason in the GitHub issue page.
To create a new instance from the previous state, it’s useful to define copyWith method. If you want automatic code generation for it, check the following post.

Data Provider
The data provider implementation is very simple in this case. It just reads data from a file.
import 'dart:convert';
import 'dart:io';

class SiteDataReader {
  Future<Map<String, dynamic>> readSiteData(String filepath) async {
    final file = File(filepath);
    final data = await file.readAsString();
    return json.decode(data);
  }
}
It decodes the string at the end to make the post-process easier.
Data Repository (Business Logic)
The business logic needs to be implemented in a repository. The class should know what to do.
import 'package:path/path.dart' as p;
import 'package:flutter_samples/bloc_pattern/site_data/site_data.dart';
import 'package:flutter_samples/bloc_pattern/site_data/site_data_reader.dart';

class SiteDataRepository {
  final SiteDataReader _reader;
  SiteDataRepository({required SiteDataReader reader}) : _reader = reader;

  Future<SiteData> readSiteData(String filename) async {
    final filepath = p.join("lib/resources", filename);
    final siteDataJson = await _reader.readSiteData(filepath);
    return SiteData.fromJson(siteDataJson);
  }
}
The code is well abstracted and thus readable. It provides the required data. Data reader is private because it shouldn’t be accessed from the outside.
Cubit
Cubit can be implemented in sync and async but it’s implemented async in this example because I don’t want to block UI. Cubit is a bridge class between UI and the business logic part. It’s completely independent of the UI. It has only a dependency on a repository.
emit() notifies the current state to UI. UI part can rebuild the UI depending on the state.
import 'package:flutter_bloc/flutter_bloc.dart';
import 'package:flutter_samples/bloc_pattern/site_data/site_data_repository.dart';
import 'package:flutter_samples/bloc_pattern/site_data/site_data_state.dart';

abstract class SiteDataCubit extends Cubit<SiteDataState> {
  final SiteDataRepository _repo;
  final String filename;
  SiteDataCubit(this._repo, {required this.filename}) : super(SiteDataState(status: SiteDataStatus.initial));

  void read({bool isFail = false}) async {
    emit(SiteDataState(status: SiteDataStatus.loading));
    await Future.delayed(Duration(seconds: 1));
    if (isFail) {
      emit(SiteDataState(status: SiteDataStatus.failure));
      return;
    }

    final result = await _repo.readSiteData(filename);
    emit(SiteDataState(status: SiteDataStatus.success, siteData: result));
  }
}

class TechnicalFeederCubit extends SiteDataCubit {
  TechnicalFeederCubit(SiteDataRepository repo, {required String filename}) : super(repo, filename: filename);
}

class UnknownSiteCubit extends SiteDataCubit {
  UnknownSiteCubit(SiteDataRepository repo, {required String filename}) : super(repo, filename: filename);
}
It’s also ok to assign SiteData.empty() in loading/failure state depending on your needs.
Cubit class needs to be created as many as the number of buttons (or something else) to trigger the process. I defined two different cubit classes since I put two buttons in this example.
UI part
Let’s check the UI part. The base implementation is the following.
class BlocAppView1 extends StatefulWidget {
  final String title;
  final Color color;
  const BlocAppView1({Key? key, required this.title, required this.color}) : super(key: key);

  @override
  _BlocAppView1State createState() => _BlocAppView1State();
}

class _BlocAppView1State extends State<BlocAppView1> {
  @override
  Widget build(BuildContext context) {
    return SafeArea(
      child: Scaffold(
        appBar: AppBar(
          backgroundColor: widget.color,
          title: Text("Bloc pattern test: ${widget.title}"),
        ),
        body: Column(
          mainAxisAlignment: MainAxisAlignment.start,
          children: [
            Row(
              mainAxisAlignment: MainAxisAlignment.spaceEvenly,
              children: [
                ElevatedButton(
                  onPressed: () => Navigator.of(context).pushNamed('/home'),
                  child: Text("Go to Home"),
                  style: ElevatedButton.styleFrom(minimumSize: Size(100, 50)),
                ),
                ElevatedButton(
                  onPressed: () => Navigator.of(context).pushNamed('/second'),
                  child: Text("Go to Second"),
                  style: ElevatedButton.styleFrom(minimumSize: Size(100, 50)),
                ),
              ],
            ),
            LabeledDivider("technicalfeeder.com"),
            generateCubitSet<TechnicalFeederCubit>(),
            LabeledDivider("example.com"),
            generateCubitSet<UnknownSiteCubit>(),
            LabeledDivider("Input Search Query"),
            generateSearchBox(), // will be explained later for bloc
          ],
        ),
      ),
    );
  }
}
It doesn’t have any special code for Bloc at the moment. The code is written in generateCubitSet() method.
How to get cubit instance from UI
Generics is used here since two different cubit classes need to be used.
Widget generateCubitSet<T extends SiteDataCubit>() {
  return Row(
    mainAxisAlignment: MainAxisAlignment.spaceEvenly,
    children: [
      ElevatedButton(
        onPressed: () {
          // Same as "BlocProvider.of<T>(context).read();"
          context.read<T>().read();
        },
        child: Text("Successful Trigger"),
      ),
      ElevatedButton(
        onPressed: () {
          BlocProvider.of<T>(context).read(isFail: true);
        },
        child: Text("Failing Trigger"),
      ),
      generateResultDisplayArea<T>(),
    ],
  );
}
A cubit class is a facade to the business logic part. It somehow needs to be created in the UI part. I will explain later how to create it. In this part, the target instance can be gotten by either the following.
context.read<T>()BlocProvider.of<T>(context)
It depends on your preference for which one to use. I used both in the code above but only one way should be used in a real project to keep consistency across the project. The target method read() is called via the cubit.
How to show widgets depending on the state
The next step is to use the state that cubit provides. We can define what we want to show in BlocBuilder widget.
The syntax is BlocBuilder<T, U> where T is Cubit and U is State.
Widget generateResultDisplayArea<T extends SiteDataCubit>() {
  return Container(
    child: BlocBuilder<T, SiteDataState>(
      builder: (context, state) {
        switch (state.status) {
          case SiteDataStatus.initial:
            return SizedBox.shrink();
          case SiteDataStatus.failure:
            return Text("Failed to load");
          case SiteDataStatus.loading:
            return CircularProgressIndicator();
          case SiteDataStatus.success:
            return Text(state.siteData.toString());
          default:
            throw Exception("Unhandled SiteDataStatus: ${state.status}");
        }
      },
    ),
    height: 100,
    width: 200,
    decoration: BoxDecoration(
      border: Border.all(color: Colors.black, width: 1),
    ),
  );
}
How to create an instance for repository/cubit
It’s important to know in which place to create the instances for repository/cubit classes. When context.read<T>() or BlocProvider.of<T>(context) is called, it starts looking for the target class to the root of the widget tree.
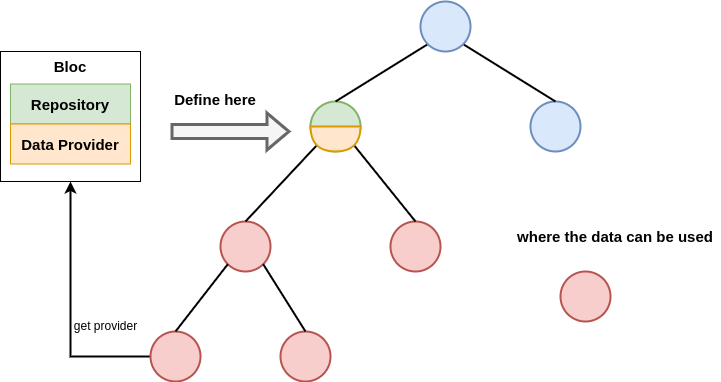
They can’t be found if they are defined in children or at the same level as the other widgets.
It takes the first instance if there are multiple instances defined in the tree. That’s why I defined two different cubit classes. If there is only one instance for the two different buttons, clicking one button shows the result in two different places.
We will go through how to use Bloc too. So this code contains cubit/bloc and the corresponding repositories.
import 'package:flutter/material.dart';
import 'package:flutter_bloc/flutter_bloc.dart';
import 'package:flutter_samples/bloc_pattern/search/search_api.dart';
import 'package:flutter_samples/bloc_pattern/search/search_bloc.dart';
import 'package:flutter_samples/bloc_pattern/search/search_repository.dart';
import 'package:flutter_samples/bloc_pattern/site_data/site_data_cubit.dart';
import 'package:flutter_samples/bloc_pattern/site_data/site_data_reader.dart';
import 'package:flutter_samples/bloc_pattern/site_data/site_data_repository.dart';
import 'package:flutter_samples/bloc_pattern/presentation/BlocAppView1.dart';
import 'package:flutter_samples/bloc_pattern/presentation/BlocAppView2.dart';
import 'package:flutter_samples/bloc_pattern/constants.dart';
import 'package:flutter_samples/main.dart';

class BlocPattern extends StatelessWidget {
  const BlocPattern({Key? key}) : super(key: key);

  @override
  Widget build(BuildContext context) {
    return MultiRepositoryProvider(
        providers: [
          RepositoryProvider(
            create: (context) => SiteDataRepository(reader: SiteDataReader()),
          ),
          RepositoryProvider(
            create: (context) => SearchRepository(reader: SearchAPI()),
          ),
        ],
        child: MultiBlocProvider(
          child: MaterialApp(
            onGenerateRoute: (settings) {
              switch (settings.name) {
                case "/":
                  return MaterialPageRoute(
                    builder: (_) => BlocAppView1(title: "first", color: Colors.pink),
                  );
                case "/second":
                  return MaterialPageRoute(
                    builder: (_) => BlocAppView2(title: "second", color: Colors.red),
                  );
                case "/home":
                  return MaterialPageRoute(builder: (_) => MyApp());
                default:
                  return null;
              }
            },
          ),
          providers: [
            BlocProvider(
              create: (context) => TechnicalFeederCubit(
                RepositoryProvider.of<SiteDataRepository>(context),
                filename: FILENAME_TECHNICAL_FEEDER,
              ),
            ),
            BlocProvider(
              create: (context) => UnknownSiteCubit(
                RepositoryProvider.of<SiteDataRepository>(context),
                filename: FILENAME_UNKNOWN,
              ),
            ),
            BlocProvider(
              create: (context) => SearchBloc(
                context.read<SearchRepository>(),
              ),
            ),
          ],
        ));
  }
}
Create a new instance in MultiRepositoryProvider. Then, cubit/bloc instance can be created in the child. Different views are defined in the child. If the same data need to be shared in different views, the cubit/bloc must be defined on a level above. In this way, the state can be shared without any additional process.
As you can see in the video, the state is shared in different views.
Bloc implementation (Real time search with debounce)
The next example is for bloc instead of cubit. This is more complex than cubit.
In this example, we will implement real-time search logic.
It does nothing while typing. If the input stops for 500ms, it reads the data from an external system. In this example, we use Fake API for the search result. It just waits for a second and returns the result.
Fake API implementation
This class is a fake implementation to provide a result. It sleeps a second and then, appends random 5-digit values to the query.
import 'dart:math';

typedef SearchResultType = Map<String, dynamic>;

class SearchResultError implements Exception {
  final String message;
  SearchResultError({required this.message});

  @override
  String toString() {
    return "SearchResultError: $message";
  }
}

class SearchAPI {
  Future<SearchResultType> fetch(String query) async {
    await Future.delayed(Duration(seconds: 1));
    final id = Random().nextInt(100);
    final addedText = Random().nextInt(90000) + 10000;

    return {
      "id": id,
      "content": "${query}_$addedText",
    };
  }

  Future<SearchResultType> throwFetchError() async {
    await Future.delayed(Duration(seconds: 1));
    throw SearchResultError(message: "A faked error occurred!!");
  }
}
Model
I just defined two properties for simplicity. If the storage is a DB, it definitely becomes more complex.
import 'package:flutter_samples/bloc_pattern/search/search_api.dart';

class SearchResult {
  final int id;
  final String content;
  SearchResult({
    required this.id,
    required this.content,
  });

  SearchResult.fromMap(SearchResultType dataMap)
      : id = dataMap["id"],
        content = dataMap["content"];

  @override
  String toString() {
    return "id: $id\ncontent: $content";
  }
}
State
There are 4 states for searching.
- Empty
- In progress
- Completed
- Error
import 'package:flutter_samples/bloc_pattern/search/search_result.dart';

abstract class SearchState {}

class SearchStateEmpty extends SearchState {}

class SearchStateInProgress extends SearchState {
  final SearchResult? cache;
  SearchStateInProgress([this.cache]);
}

class SearchStateCompleted extends SearchState {
  final SearchResult data;
  SearchStateCompleted(this.data) : super();
}

class SearchStateError extends SearchState {
  final String error;
  SearchStateError(this.error) : super();
}
The result can be empty for searching queries or before searching.
While the first search is in progress, the result hasn’t been set yet. However, the previous result needs to be shown on the UI while the second or the later search is in progress. That’s why SearchStateInProgress requires a cache property.
Event
In this example, the event is very simple. It has only the following event.
class SearchQueryEvent {
  final String query;
  SearchQueryEvent({
    required this.query,
  });
}
If it’s an audio player, there are 5 events considered.
- Start
- Pause
- Stop
- Resume
- Completed
5 event classes need to be created in this case but we need only one event class in this example.
Repository
The repository is also simple and readable. It throws an error every 3 calls just for testing purposes.
import 'package:flutter_samples/bloc_pattern/search/search_api.dart';
import 'package:flutter_samples/bloc_pattern/search/search_result.dart';

class SearchRepository {
  final SearchAPI _reader;
  int _count = 0;

  SearchRepository({
    required SearchAPI reader,
  }) : _reader = reader;

  Future<SearchResult> searchData(String query) async {
    _count++;
    if (_count % 3 != 0) {
      final siteDataJson = await _reader.fetch(query);
      return SearchResult.fromMap(siteDataJson);
    } else {
      await _reader.throwFetchError();
      throw Exception("Program can't be reached here.");
    }
  }
}
Bloc
This is the main class for Bloc. The syntax is Bloc<T, U> where T is Event and U is State. The incoming event must be converted to the state.
We don’t want to trigger the search process every time when a user updates the query. So it somehow needs to be handled. It’s done in debounce() function assigned to transformer property.
If multiple events are defined, we need to define as many on<Event> functions as the number of events.
import 'package:flutter_bloc/flutter_bloc.dart';
import 'package:flutter_samples/bloc_pattern/search/search_api.dart';
import 'package:flutter_samples/bloc_pattern/search/search_event.dart';
import 'package:flutter_samples/bloc_pattern/search/search_repository.dart';
import 'package:flutter_samples/bloc_pattern/search/search_result.dart';
import 'package:flutter_samples/bloc_pattern/search/search_state.dart';
import 'package:flutter_samples/bloc_pattern/common.dart';

class SearchBloc extends Bloc<SearchQueryEvent, SearchState> {
  final SearchRepository _repository;
  SearchResult? _cache;

  SearchBloc(this._repository) : super(SearchStateEmpty()) {
    on<SearchQueryEvent>(
      _onTextChange,
      transformer: debounce(const Duration(milliseconds: 500)),
    );
  }

  Future<void> _onTextChange(SearchQueryEvent event, Emitter<SearchState> emit) async {
    if (event.query.isEmpty) {
      print("emptyr query");
      return emit(SearchStateEmpty());
    }

    print("query something");
    emit(SearchStateInProgress(_cache));

    try {
      final searchResult = await _repository.searchData(event.query);
      _cache = searchResult;
      emit(SearchStateCompleted(searchResult));
    } on SearchResultError catch (error) {
      emit(SearchStateError(error.toString()));
    }
  }
}
The debounce() function looks like this. If it’s defined in a separate file, it can be used for different events. Don’t forget to add rxdart package to your dependency.
import 'package:flutter_bloc/flutter_bloc.dart';
import 'package:rxdart/rxdart.dart';

EventTransformer<T> debounce<T>(Duration duration) {
  return (events, mapper) => events.debounceTime(duration).flatMap(mapper);
}
If you want to know the state change and the transition, override the following methods on your needs.
@override
void onChange(Change<SearchState> change) {
  super.onChange(change);
  print(change);
  // Change { currentState: Instance of 'SearchStateError', nextState: Instance of 'SearchStateInProgress' }
  // Change { currentState: Instance of 'SearchStateInProgress', nextState: Instance of 'SearchStateCompleted' }
}

@override
void onTransition(Transition<SearchQueryEvent, SearchState> transition) {
  super.onTransition(transition);
  print(transition);
  // Transition { currentState: Instance of 'SearchStateCompleted', event: Instance of 'SearchQueryEvent', nextState: Instance of 'SearchStateInProgress' }
  // Change { currentState: Instance of 'SearchStateCompleted', nextState: Instance of 'SearchStateInProgress' }
  // Transition { currentState: Instance of 'SearchStateInProgress', event: Instance of 'SearchQueryEvent', nextState: Instance of 'SearchStateCompleted' }
}
We can know which event triggers the transition if overriding onTransition() method.
Do you want to compare BLoC with Riverpod?
Check the following post if you want to compare BLoC with Riverpod.
Comments