When we want to tell a message to a user, showing the message on a dialog is one of the ways. Flutter offers the following two ways for simple dialog.
- AlertDialog
Message with button(s) - SimpleDialog
Choose a item from a list
If the required specification can be fulfilled with neither the two above, we need to implement our own dialog but this article doesn’t do it.
Show a message with AlertDialog
The class implementation is as follows.
class DialogSample extends StatefulWidget {
@override
_DialogSample createState() => _DialogSample();
}
class _DialogSample extends State<DialogSample> {
String? result;
@override
Widget build(BuildContext context) {
// implementation of dialogs here
...
final clear = ElevatedButton(
onPressed: () {
setState(() {
result = null;
});
},
child: Text("CLEAR RESULT"),
);
return SafeArea(
child: Scaffold(
appBar: AppBar(
title: Text("Dialog Sample"),
),
body: Center(
child: Column(
children: [
// dialog variables here
...
Padding(
padding: EdgeInsets.only(top: 30),
child: Text("result: ${result ?? ""}"),
),
clear,
],
),
),
),
);
}
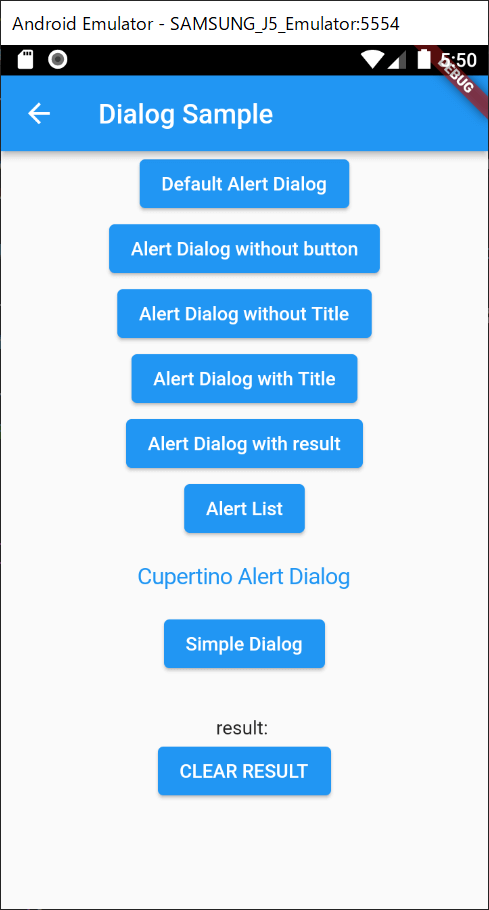
}The page looks like this.
Default Alert Dialog – without parameters
AlertDialog doesn’t require any mandatory parameters but it doesn’t make sense to show a dialog without contents. I’m not sure why it doesn’t have the required parameters but let’s check the default AlertDialog.
final defaultAlertDialog = ElevatedButton(
  onPressed: () async {
    showDialog(
      context: context,
      builder: (context) => AlertDialog(),
    );
  },
  child: Text("Default Alert Dialog"),
);
What’s this? It just makes the screen darker. I want to know the use case.
Add contents
The basic implementation for AlertDialog is very simple. The following is a minimal example.
final alertDialogWithoutButton = ElevatedButton(
  onPressed: () async {
    showDialog(
      context: context,
      builder: (context) => AlertDialog(
        content: Text("Hello"),
      ),
    );
  },
  child: Text("Alert Dialog without button"),
);
AlertDialog is a widget. It means that it must be used as a child of another widget but a dialog is a dialog. It’s a complete view alone. Therefore, we need to move from the current view to the dialog page by Navigator.of(context).push() but showDialog function does it for us.
This is the implementation of showDialog. This function is offered by Flutter.
Future<T?> showDialog<T>({
  required BuildContext context,
  required WidgetBuilder builder,
  bool barrierDismissible = true,
  Color? barrierColor = Colors.black54,
  String? barrierLabel,
  bool useSafeArea = true,
  bool useRootNavigator = true,
  RouteSettings? routeSettings,
}) {
  assert(builder != null);
  assert(barrierDismissible != null);
  assert(useSafeArea != null);
  assert(useRootNavigator != null);
  assert(debugCheckHasMaterialLocalizations(context));

  final CapturedThemes themes = InheritedTheme.capture(
    from: context,
    to: Navigator.of(
      context,
      rootNavigator: useRootNavigator,
    ).context,
  );

  return Navigator.of(context, rootNavigator: useRootNavigator).push<T>(DialogRoute<T>(
    context: context,
    builder: builder,
    barrierColor: barrierColor,
    barrierDismissible: barrierDismissible,
    barrierLabel: barrierLabel,
    useSafeArea: useSafeArea,
    settings: routeSettings,
    themes: themes,
  ));
}
As you can see, Navigator.of(context).push() is called for the page transition.
Add a button to the dialog
The previous example shows a message but it doesn’t have a button. I think it’s better to put a button to disappear the dialog for the user experience. If a button is there, it’s clearer for a user where to press to disappear the dialog.
I created the following function for the dialog.
Future<String?> showAlert(BuildContext context, String msg) {
  final ok = TextButton(
    onPressed: () {
      Navigator.of(context).pop();
    },
    child: Text("OK"),
  );

  final alert = AlertDialog(
    content: Text(msg),
    actions: [ok],
  );

  return showDialog(
    context: context,
    builder: (BuildContext context) => alert,
  );
}
OK button is added to the dialog. actions property is the proper place to put. As I mentioned above, since the dialog is a page, we need to call Navigator.of(context).pop() function to go back to the original page.
This is the caller side.
final alertDialog = ElevatedButton(
  onPressed: () async {
    await showAlert(context, "Error message here");
  },
  child: Text("Alert Dialog without Title"),
);
The page moves to the original page even if pressing outside of the dialog. If Navigator.of(context).pop() is not called in the onPressed event in the button, it doesn’t do the page transition.
Add a Title
Let’s add a title. We have to assign a widget there. Typically it is a Text widget.
Future<String?> showAlertList(
  BuildContext context,
  List<String> msg, [
  String? title,
]) {
  final ok = TextButton(
    onPressed: () {
      Navigator.of(context).pop();
    },
    child: Text("OK"),
  );

  final alert = AlertDialog(
    // title added here
    title: title != null ? Text(title) : null,
    content: SingleChildScrollView(
      child: ListBody(
        children: msg.map((e) => Text(e)).toList(),
      ),
    ),
    actions: [ok],
  );

  return showDialog(
    context: context,
    builder: (BuildContext context) => alert,
  );
}

final alertDialogWithTitle = ElevatedButton(
  onPressed: () async {
    await showAlert(context, "Error message here", "Message");
  },
  child: Text("Alert Dialog with Title"),
);
How to get result from a dialog
If we want to just show a message to a user, we don’t have to get a result from the dialog. However, if there are two buttons, we might want to know which button is pressed.
Firstly we need to pass the result to pop function. In this example, the result is a string “OK”.
final ok = TextButton(
  onPressed: () {
    Navigator.of(context).pop("OK");
  },
  child: Text("OK"),
);
The return data type of showDialog function is Future. We need to wait for it on the caller side with await keyword. The value specified in the pop function is returned from showDialog.
To reflect the change to the view, set the result in setState.
final alertDialogWithResult = ElevatedButton(
  onPressed: () async {
    final result =
        await showAlert(context, "Error message here", "Message");
    setState(() {
      this.result = result;
    });
  },
  child: Text("Alert Dialog with result"),
);
As you can see, the string “OK” is shown at the bottom.
If you need to use Provider or Riverpod the following articles might be helpful.

Handling message list
There might be some cases that the message is a list. Of course, it’s easy to convert the list to one string to use it in a Text widget but we can set the list as it is.
Future<String?> showAlertList(
  BuildContext context,
  List<String> msg, [
  String? title,
]) {
  final ok = TextButton(
    onPressed: () {
      Navigator.of(context).pop("OK");
    },
    child: Text("OK"),
  );

  final alert = AlertDialog(
    title: title != null ? Text(title) : null,
    // SingleChildScrollView and ListBody
    content: SingleChildScrollView(
      child: ListBody(
        children: msg.map((e) => Text(e)).toList(),
      ),
    ),
    actions: [ok],
  );

  return showDialog(
    context: context,
    builder: (BuildContext context) => alert,
  );
}
AlertDialog.content has the following description.
Typically this is a [SingleChildScrollView] that contains the dialog’s message. As noted in the [AlertDialog] documentation, it’s important to use a [SingleChildScrollView] if there’s any risk that the content will not fit.
ListBody is not scrollable whereas ListView is. SingleChildScrollView can make the child scrollable. I implemented it like this because the official page uses them.
final alertList = ElevatedButton(
  onPressed: () async {
    final list = [for (int i = 0; i < 50; i++) i.toString()];
    final result = await showAlertList(context, list, "List");
    setState(() {
      this.result = result;
    });
  },
  child: Text("Alert List"),
);
If we set the list above, it looks like this.
The list is scrollable.
Cupertino version
There is a Cupertino version for the AlertDialog. The usage is basically the same.
Future<String?> showAlertCuperutino(
  BuildContext context,
  String msg, [
  String? title,
]) async {
  final ok = CupertinoDialogAction(
    onPressed: () {
      Navigator.of(context).pop("OK");
    },
    child: Text("OK"),
  );

  final alert = CupertinoAlertDialog(
    title: title != null ? Text(title) : null,
    content: Text(msg),
    actions: [ok],
  );

  return showDialog(
    context: context,
    builder: (BuildContext context) => alert,
  );
}
final alertCupertino = CupertinoButton(
  onPressed: () async {
    final result = await showAlertCuperutino(
      context,
      "Error message for cupertino",
      "ERROR",
    );
    setState(() {
      this.result = result;
    });
  },
  child: Text("Cupertino Alert Dialog"),
);
It looks darker than the Material version.
The title parameter is in brackets because it’s optional parameter. Check this article as well if you want to know the detail.
Add an option list by SimpleDialog
If we want a user to select an item from the options list, SimpleDialog is a proper widget. To create a list, we need to set a value to a SimpleDialogOption and set it to the children.
The following example offers 100 items to select an age.
Future<String?> selectAge(BuildContext context) {
  Widget _boldText(String text) {
    return Text(
      text,
      style: TextStyle(fontWeight: FontWeight.bold),
    );
  }

  final simple = SimpleDialog(
    title: Text("Age"),
    children: [
      for (int i = 0; i < 99; i++)
        SimpleDialogOption(
          child: Center(
            child: _boldText(i.toString()),
          ),
          onPressed: () {
            Navigator.of(context).pop(i.toString());
          },
        ),
    ],
  );
  return showDialog(
    context: context,
    builder: (context) => simple,
  );
}

final simpleDialog = ElevatedButton(
  onPressed: () async {
    final result = await selectAge(context);
    setState(() {
      this.result = result;
    });
  },
  child: Text("Simple Dialog"),
);
The result is set in pop function called in onPressed event. I chose 31 and it’s shown on the result text label.
Change the width and height
If the option list is long, the height of the dialog is big. If we want to adjust the size of the dialog, we need to set insetPadding property. If it is not set, the following value is set by default.
const EdgeInsets _defaultInsetPadding = EdgeInsets.symmetric(horizontal: 40.0, vertical: 24.0);Let’s change the size of the dialog.
final simple = SimpleDialog(
  title: Text("Age"),
  // add
  insetPadding: EdgeInsets.symmetric(horizontal: 120.0, vertical: 200.0),
  children: [
    for (int i = 0; i < 99; i++)
      SimpleDialogOption(
        child: Center(
          child: _boldText(i.toString()),
        ),
        onPressed: () {
          Navigator.of(context).pop(i.toString());
        },
      ),
  ],
);
End
Dialog should be consistent in the same application. I recommend creating a function to show a message. This is an example. The return value is unnecessary in many cases, so you can change the definition in this case.
Future<String?> showAlert(
  BuildContext context,
  String msg, [
  String? title,
]) {
  final ok = TextButton(
    onPressed: () {
      Navigator.of(context).pop("OK");
    },
    child: Text("OK"),
  );

  final alert = AlertDialog(
    title: title != null ? Text(title) : null,
    content: Text(msg),
    actions: [ok],
  );

  return showDialog(
    context: context,
    builder: (BuildContext context) => alert,
  );
}
Comments