When I search about testing for Node-RED flow official page appears on the top of the result. It explains how to write tests for our own node. However, we can’t find a way how to write tests for a whole flow. Someone adds a Test tab to his flow and write a test there but it is really hard to maintain. I will explain how to write Node-RED flow test in this post. I have worked with Node-RED for more than 2 years and created lots of our own nodes. Some input nodes create more than two outputs. I will explain how to handle this case as well.
Go to the following article if you don’t know how to write your own node in TypeScript.
My environment for this test is the following.
Windows 10: Professional, build version 18363
Node-RED : 1.2.9
node-red-node-test-helper: 0.2.6
Basic idea to write flow test
Writing Node-RED flow test is basically based on the node test. If you don’t know how to write a node test you might want to check the official page first. In the example, JSON object is created for the node test and it is passed to helper.load function. As you know, the actual flow is also JSON object. If we load the whole flow file in our test we can test the whole flow but there are some important points to mention.
- All used nodes must be loaded
- Input/output node needs to be replaced with helper node
- Difficult to test with timer friend function like
setTimeout,setInterval
All used nodes must be loaded
All used nodes must be loaded because node-red-node-test-helper throws an error or the tests just fail. While I wrote the test cases the test just failed because helper.getNode() returned null. I remember that a test threw an error in my project before but I don’t remember which helper node version I used then. When using our own nodes it shouldn’t be a problem but when we load the actual flow file we have to load existing nodes provided by Node-RED. The directories where those nodes exist depends on the Node-RED version. If the Node-RED version is 1.0.0 or later they are under node_modules/@node-red/nodes/. If you have more than two flow files you should put all used nodes into one variable to make it DRY even if some of them are not used in a flow file.
const requiredNodes = [
    require("../node_modules/@node-red/nodes/core/common/20-inject.js"),
    require("../node_modules/@node-red/nodes/core/common/21-debug.js"),
    require("../node_modules/@node-red/nodes/core/function/10-function.js"),
    require("../node_modules/@node-red/nodes/core/function/10-switch.js"),
];
Input/output node needs to be replaced with helper node
Input/output node needs to be replaced with helper node because we want to send test data. We probably have nodes that send a message when Node-RED runs. We need to stop them for unit test. Otherwise, you will see a test sometimes fails for unknown reason. Yes, I actually faced this problem and it took me a while to recognize that one of inject nodes was not replaced. This behavior happens when Inject once after xx seconds, then is enabled in the inject node. The bomb explodes after the test succeeded and the subsequent test is running. It’s better to replace all inject node in order to avoid sending an unintended message. Following is an example code for a flow that has only one input/output node.
let inputNodeId: number;
let outputNodeId: number;

function loadFlowFile() {
    const flow: any[] = require("../flow/flows.json");
    flow.forEach((node) => {
        if (node.type === "inject") {
            inputNodeId = node.id;
            node.type = "helper";
        }
        if (node.type === "debug") {
            outputNodeId = node.id;
            node.type = "helper";
        }
    });
    return flow;
}
In case we have many input nodes which are the same node type and sends a message with the configuration data we should use Map data type to store the node info. We can assign node.name or combination of the properties to create a key. The code looks like this below.
function createKey(ownNode: any){
    return `${ownNode.prop1}_${ownNode.prop2}`;
}

let ownNodeIds = new Map<string, string>();
if(node.type === "own-node-type") {
    const key = createKey(node);
    ownNode.set(key, node.id);
}
This way works well when we have a test data creation class that is used for a different test. In my project, an input node sends a message to multiple output interfaces. It means I need to feed the same test data to all of them. Since it is not good practice to test more than two things in a test I separated the test into multi-test cases in my project. We can manage test data creation code in one place and reuse it in different tests. My idea was successful in my project because most tests look easy to read. It looks like this.
it("should send Auto when input node sends 50", () => {
    const input = InputNode.RunningMode.return50();
    const expected = OutputNode.RunningMode.Auto();
    runTest(input, expected);
});
Difficult to test with timer friend function
It’s difficult to test with timer friend function like setTimeout, setInterval. If we use nodes that use those timer friend functions we should consider making it bypass. If timer is working inside a node we can’t control when to send a message to the linked nodes. The test may succeed on your machine but may fail on a build server. This is also what I faced in my project. Sometimes fails and sometimes succeeds. We have to wait that the build server gets into a good mood again. It’s really annoying. To control the timer we need to replace it with a stub function but if we stub the function Node-RED may not work because timer friend functions are used in it to send a message to subsequent nodes. Since internal implementation will change we should not rely on it. If you don’t want to make the node bypass there is another solution. Write a test between the input node and the timer using node and another test is from the timer using node to output node.
Simple test code
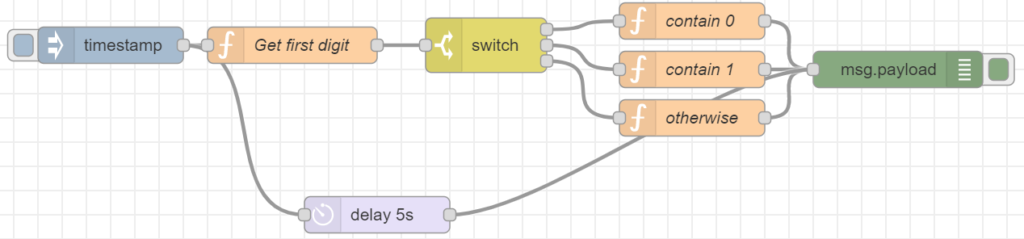
Let’s write a test code for a very simple flow file. Inject node sends a message with a timestamp. Function node gets the first digit and switch node will send it according to the result.

This is the simple flow test. You can look at the detailed implementation of loadFlowFile above.
it("should send 'payload contains 0' when the first digit is 0", (done) => {
    const flow = loadFlowFile();
    helper.load(requiredNodes, flow, () => {
        const inputNode = helper.getNode(inputNodeId);
        const outputNode = helper.getNode(outputNodeId);

        outputNode.on("input", (msg: any) => {
            try {
                expect(msg.payload).to.equal("payload contains 0")
                done();
            } catch (e) {
                done(e);
            }
        });

        inputNode.wires[0].forEach((wire: string) => {
            const node = helper.getNode(wire);
            node.receive({ payload: 123450 });
        })
    });
});
I use try-catch in the “input” event callback because it doesn’t report the correct error message when it fails. Let’s have a deep look to know how to send test data. It uses wires property to get nodes that are connected to the input node. All nodes have wires property and it looks like this.
"wires": [
    [febd7061.9dd62"],
    ["caacdaec.dd3248"],
    ["ab6ff83e.4f82a8"]
]
This is for switch node which has 3 output ports, so it has 3 arrays. If multiple wires are connected from the same output port the array has multiple elements. I think most input nodes have only one output port. That’s why I specified wires[0]. If your own node has multi ports you need to change the implementation but it might be better to change the implementation in this case. In the forEach loop, it gets a node and sends the data to it. It’s important to specify payload property otherwise it doesn’t send the message.

Advanced flow test
I wrote that it’s difficult to test with a node that uses timer friend functions in it. If the node is our own node we should write a unit test for the node. Then, we don’t have to write the test again in our flow file and we can make the node bypass.
Another thing we should consider is test segregation. A message sent by an input node can be multiple messages in the flow. One output node can receive two different messages in this case. How can we segregate the test?
I added a delay node which probably call setTimeout function in the node. It sends received data after 5 seconds so it doesn’t get tests failed. Let’s consider how we can write a test for this flow.
Make a node bypass
It’s currently 5 seconds but it may be 1 hour or day in the production system. I can’t wait for a long time. The idea is to replace the actual logic with our own logic. To get to a point, define input event callback like the following.
const delayNode = helper.getNode("51e3ca87.635c04");
delayNode.on("input", (msg: any) => {
    delayNode.send(msg);
});
When we add an event callback to the node node-red-node-test-helper override the behavior. It seems that helper removes the original logic. I guess helper assigns a new EventEmitter class to the node that’s why the original behavior goes away.
Disabling a node (blocking a message)
If a very short time is set to the delay node in the example flow above it may break the other test cases. In opposite, the output node may receive a message through the switch node which causes test error for a new test. We somehow need to take care of it. The idea is the same as above. Replace the original behavior with our own logic but this time we don’t need logic. Specify empty callback.
const switchNode = helper.getNode("56726766.6d5378");
switchNode.on("input", (msg: any) => { });
I recommend creating a function for it.
function blockMessagesOn(nodeIds: string[]){
    nodeIds.forEach((nodeId) => {
        const node = helper.getNode(nodeId);
        node.on("input", (msg: any) => {});
    });
}
This is quite useful when a node has multiple output wires because one message is propagated to more than 2 output nodes. We should write a different test for it because one test case should check only one thing.
Debugging Node-RED flow test
We want to do debug when the output node doesn’t receive any messages. It often happens when the flow is big and the input message payload has a big structure. You can check how far the input message reaches by the following function.
function spyOn(nodeIds: NodeId[]): void {
    nodeIds.forEach((id) => {
        helper.getNode(id).on("input", (msg: any) => {
            console.log(msg);
        });
    });
}
This needs to be called in helper.load function callback. I recommend calling it at the top.
 helper.load(requiredNodes, flow, () => {
    spyOn(["your-node-id1", "your-node-id2"]);
    // your test code here
}
If your payload has a timestamp you should check if the data type is the same as the actual data type. The test may fail when using input string timestamp whereas actual data type is moment or Date. Remove this spy function after you finish writing your test because the test may start failing due to an unknown Node ID.
Test for a message that is NOT sent
There are many cases that a node doesn’t send any message to subsequent nodes depending on the payload value. How can we write a test in this case? I think there are two ways for it if it is a function node or our own node.
- Confirm that the output node doesn’t receive any message until timeout occurs
- Call
node.tracefunction in the function node and check if the trace is called with specified arg
The first way can be used for all cases but it takes a while to complete the test because we have to wait for the timeout. We shouldn’t rely on timer related functions in our test if possible. It should be replaced with fake object. I think it is simple code, so I don’t write it here.
The second way might be better than the first one if we can maintain the code when updating Node-RED because its test is done in a short time. I added a function node “Not send msg” that calls node.trace and return nothing.
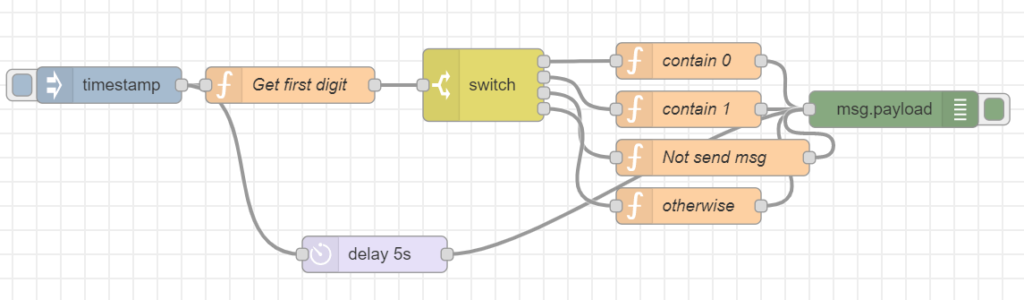
The code of the function node is following.
node.trace("not sent");
return;
I think calling trace function doesn’t harm our application. Debug or higher level logging function is normally used in production code. If it is acceptable to call node.trace function we can spy it.
it("should block when the first digit is 3", (done) => {
    const flow = loadFlowFile();
    helper.load(requiredNodes, flow, () => {
        const inputNode = helper.getNode(inputNodeId);
        const notSendFunctionNode = helper.getNode("49a5f029.e3bdf");

        notSendFunctionNode._complete = (msg: any, err: any) => {
            try {
                console.log(msg); // { payload: '3', _msgid: 'eb1afc17.f9d8f' }
                notSendFunctionNode.trace.should.be.calledWith("not sent");
                done();
            } catch (e) {
                done(e);
            }
        };
        inputNode.wires[0].forEach((wire: string) => {
            const node = helper.getNode(wire);
            node.receive({ payload: 123453 });
        })
    });
});
I want to mention again that we may need to adjust the code when updating Node-RED because the function _complete is private. The code above works when the version is 1.2.9. I checked that the function is accessible via node.__proto__.__proto__._complete in previous version.
Complete Node-RED flow test
The complete Node-RED flow test looks like this below.
it("make delay node bypass and block switch node", (done) => {
    const flow = loadFlowFile();
    helper.load(requiredNodes, flow, () => {
        const inputNode = helper.getNode(inputNodeId);
        const outputNode = helper.getNode(outputNodeId);

        outputNode.on("input", (msg: any) => {
            try {
                expect(msg.payload).to.equal(123452);
                done();
            } catch (e) {
                done(e);
            }
        });

        const delayNode = helper.getNode("51e3ca87.635c04");
        delayNode.on("input", (msg: any) => {
            delayNode.send(msg);
        });

        const switchNode = helper.getNode("56726766.6d5378");
        switchNode.on("input", (msg: any) => { });

        inputNode.wires[0].forEach((wire: string) => {
            const node = helper.getNode(wire);
            node.receive({ payload: 123452 });
        })
    });
});
This can be used in other tests too, so it may be better to make them utility functions for bypass and blocking messages.
function bypass(nodeId: string) {
    const node = helper.getNode(nodeId);
    node.on("input", (msg: any) => { node.send(msg); });
}
function blockNodes(nodeIds: string[]) {
    nodeIds.forEach((nodeId) => {
        const node = helper.getNode(nodeId);
        node.on("input", () => { });
    });
}
Does your flow test fail? Are you using fake timer? Then, this post can solve your problem.
How to set global/flow variables
If global or flow variable is used in our flow we need to set the value. How can we do that? I prepared the following simple flow.

The contents of the function node are the following.
msg.payload = {
    global: global.get("global") || "undefined",
    flow: flow.get("flow") || "undefined",
    context: context.get("context") || "undefined",
};

return msg;
We can set the value to global or flow variable in the following way.
targetNode.context().global.set("global", "global-test-value");
targetNode.context().flow.set("flow", "flow-test-value");
I tried to set value to context variable but it was not possible. Test threw an error. By the way, we can set the value from any node, I guess. We don’t have to use the function node that actually uses the variable(s). Since we get input and output nodes, we can use one of them. In the following example, inputNode variable that is Inject node is used to set the value.
it("should set global and flow values", (done) => {
    const flow = loadFlowFile();
    helper.load(requiredNodes, flow, () => {
        const inputNode = helper.getNode(inputNodeIds[1]);
        const outputNode = helper.getNode(outputNodeIds[1]);
        inputNode.context().global.set("global", "global-test-value");
        inputNode.context().flow.set("flow", "flow-test-value");

        outputNode.on("input", (msg: any) => {
            try {
                expect(msg.payload).to.deep.equal({
                    global: "global-test-value",
                    flow: "flow-test-value",
                    context: "undefined",
                });
                done();
            } catch (e) {
                done(e);
            }
        });

        inputNode.wires[0].forEach((wire: string) => {
            const node = helper.getNode(wire);
            node.receive({ payload: 123453 });
        })
    });
});
Is the test execution time too long?
The bigger the flow file becomes, the slower the test is! It takes a long time to prepare the flow in helper.load function. What its function does is not only to load the json file but also set up by loop of loop of loop. It may take more than 300ms for the preparation step. Test execution time is probably more than 30 seconds if there are 100 tests because each test needs to call helper.load function. Test execution time will easily be minutes order!
I have tried to improve the performance several times without changing node-red-node-test-helper module but I couldn’t. Therefore, tried to modify the module and I could finally manage to do it! The following article is the complete guide for the improvement.
Leave a comment if you have any questions.


Comments
Hi Yuto,
Thanks for an excellent guide!
One question though – we are having problems loading the complete flow file, when we just take flow from one of our tabs its ok.
As you write for some reason helper.getNode() will just return null without any proper error messages when we load the complete flow file. Do you have any tips on how to debug this issue?
Regards,
Mrtn
Hi Mrtn,
Yes, I faced the same problem many times.
It occurs when used nodes are missing in the first argument of helper.load function. All node definitions used in your flow file must be included in it.
If your own node has configuration node you need to either
1. replace it with helper type
2. remove the node entry
3. add the configuration node definition to requiredNodes
These must be done before calling helper.load function.
Hello.
I am trying to implement unit test on my node red flow.
I have managed to get the basics up and running.
My problem is how i should handle global and flow variables.
do you have a way to “inject” global and flwo variables from the unit test inot the flow. so that it does not fail ? as i have mulitple “funcitons” nodes that uses global and flow variables they will fail due to the vraibles missing.
Any suggestions to how i could solve that ?
Hi,
You can set the value in the following way.
const yourNode = helper.getNode("your-node-id");

yourNode.context().global.set("global", "global-test-value");

yourNode.context().flow.set("flow", "flow-test-value");
The “yourNode” doesn’t have to be the same node that uses the variable. You can set the value on any nodes because it is global and flow variable.
Make sure that the node to set the value is in the same Tab (Flow) if it is different from the one that uses the variable(s).
I added chapter “3.6. How to set global/flow variables” for the explanation.