I recently implemented logic to provide state machine info. At first I didn’t implement it by State pattern but I felt it was not so nice because a function or class needs to know a lot and it has some flags which can somehow be removed. So I decided to change the structure and refactored it with State pattern. I will show how my first implementation looks like and how I improved it. I hope you will learn how to apply state pattern to solve your own problem.
Specification of the State Machine
There were 5 states for the state machine but the data source provided only 3 states and I needed to use another data sources in order to complement additional 2 states. I had already implemented to read those additional data. The system worked on Node-RED and I created my own node to determine which state to send. Those additional data came from some other nodes. It meant that the node had to receive original state data followed by additional data. It was easy to implement logic to read all required data in the same node. I actually implemented it at first but I discarded the implementation because I needed to take account of performance. The performance of the API call depended on the user setting. There were already nodes to read those data on the existing flow. It was easier to implement the logic to read those data in the same node than receiving those data from other nodes because the order of the used data to read in the node is fixed. If it receives those data from other nodes the order can vary.
What the node has to do is following. This is overview.
- Receive original state data first.
- Send current state if other data are not needed. Otherwise, wait for other data.
- Receive other data and evaluate the current state
It is not easy to understand what the actual specification is without state machine diagram. Following is the diagram which I want to implement.
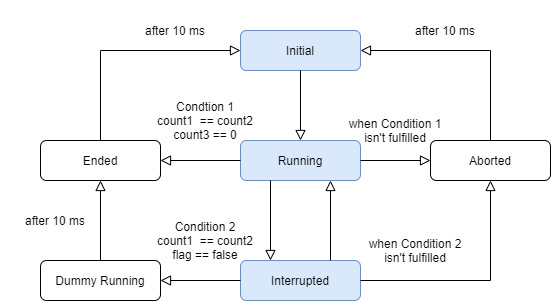
Blue colored squares are the original state. Data source can provide only those 3 states but we need to send other states as well according to the current status. New value for count1 must be assigned only once when the state changes from Initial to Running. The count1 value must not be updated even if our own node receives new count1 value.
Let’s define State enum from the state machine diagram.
export enum State {
    Undefined = "Undefined",
    Initial = "Initial",
    Running = "Running",
    Interrupted = "Interrupted",
    Aborted = "Aborted",
    Ended = "Ended",
    // internal state
    DummyRunning = "DummyRunning",
    RunningToInitial = "RunningToInitial",
    InterruptedToInitial = "InterruptedToInitial",
}First implementation without state pattern
I created a flow chart for the implementation. Let’s see how it looks like.
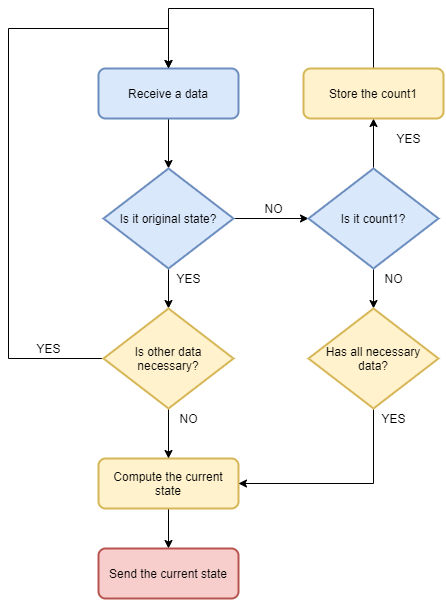
A Node-RED node receives a message from other node. It needs to check whether the data is original state info or not. If it is original state and its transition is following the node can determine which state to send.
- Initial -> Running
- Running -> Interrupted
- Interrupted -> Running
Otherwise, the node needs to wait for other data. It’s possible to put everything into one function but it gets the logic more tangled. Therefore, I created 3 functions. By the way, the color matches the flow chart above.
- updateState (Yellow): Receives original state and sets current state.
- store (Blue): Stores the additional data and sets current state when it needs to change.
- emit (Red): Sends the current state.
All functions are void and require following arguments.
updateState(current: State): void;
store(key: string, value: number | boolean): void;
emit(callback: (state: State) => void): void;
Whenever the node receives new data from other node it has to determine which state to send. It means that a caller has to call emit function every time it calls updateState and store. A caller has to call those functions in following way.
if(isOriginalState(msg.payload)) {
    updateState(msg.payload);
} else {
    store(msg.payload.key, msg.payload.value);
}
emit(callback);
By the way, Node-RED node sends msg object which has payload property. It is any data type, so we can set anything there. In this case, my own node expects that msg.payload has key and value properties. Our own node sends current state if it is possible to determine which state to send when it receives new data. If it is not possible to determine it doesn’t send any message.
Following code is my first implementation for updateState function.
public updateState(current: State): void {
    if (!this.lastState) {
        this.lastState = current;
        this.isCount1Updatable = true;
        this.emitter = getInitialValue();
        return;
    }

    this.isCount1Updatable = false;

    if (this.isInitialToRunning(current)) {
        this.lastState = current;
        this.isCount1Updatable = true;
        this.emitter = State.Running;
        return;
    }
    if (this.isRunningToInterrupted(current)) {
        this.lastState = current;
        this.emitter = State.Interrupted;
        return;
    }
    if (this.isInterruptedToRunning(current)) {
        this.lastState = current;
        this.emitter = State.Running;
        return;
    }
    if (this.isRunningToInitial(current)) {
        this.lastState = current;
        this.emitter = State.Undefined;
        this.currentState = State.RunningToInitial;
        return;
    }
    if (this.isInterruptedToInitial(current)) {
        this.lastState = current;
        this.emitter = State.Undefined;
        this.currentState = State.InterruptedToInitial;
        return;
    }

    function getInitialValue() {
        if (current === State.Initial) {
            return State.Initial;
        }
        if (current === State.Running) {
            return State.Running;
        }
        if (current === State.Interrupted) {
            return State.Interrupted;
        }
        throw new Error(`Undefined state: ${current}`);
    }
}
First state is Initial in most cases but it can receive another state when the data source machine has already been running before this application starts. That’s why I added the logic between line 2 and 7. When the state changes in following way it cannot determine which state to send. Therefore, State.Undefined is assigned to emitter and internal state is assigned to current state.
- Running to Initial
- Interrupted to Initial
Next is store function. It needs to change the state when it receives all required data and the state is either InterruptedToInitial or RunningToInitial.
export enum Key {
    Count1 = "Count1",
    Count2 = "Count2",
    Count3 = "Count3",
    Flag = "Flag",
}

public store(key: string, value: number | boolean): void {
    this.map.set(key, value);
    if (this.isCount1Updatable && key === Key.Count1) {
        this.count1 = value as number;
        this.isCount1Updatable = false;
        return;
    }

    const count2 = this.map.get(Key.Count2);
    const count3 = this.map.get(Key.Count3);
    const flag = this.map.get(Key.Flag);

    if (count2 === undefined ||
        count3 === undefined ||
        flag === undefined
    ) {
        return;
    }

    this.map.clear();
    if (this.currentState === State.InterruptedToInitial) {
        if (this.count1 === count2 && flag === false) {
            this.emitter = State.DummyRunning;
            return;
        }
        this.emitter = State.Aborted;
        return;

    } else if (this.currentState === State.RunningToInitial) {
        if (this.count1 === count2 && count3 === 0) {
            this.emitter = State.Ended;
            return;
        }
        this.emitter = State.Aborted;
        return;
    }
}
You might think undefined check should be moved to if-else clause. You can do it of course but it looks more complicate. So I didn’t write it there for the simplicity. However, this is the point which we want to improve.
The last function is emit. The code is following.
public emit(callback: SenderCallback) {
    if (this.emitter === State.DummyRunning) {
        callback(State.Running);
        setTimeout(() => {
            callback(State.Ended);
            setTimeout(() => {
                callback(State.Initial);
            }, this.interval);
        }, this.interval);
    } else if (this.emitter === State.Aborted) {
        callback(this.emitter);
        setTimeout(() => {
            callback(State.Initial);
        }, this.interval);
    } else if (this.emitter === State.Ended) {
        callback(this.emitter);
        setTimeout(() => {
            callback(State.Initial);
        }, this.interval);
    } else {
        callback(this.emitter);
    }
}
It looks not good… The combination of if-else and setting callback to setTimeout makes the looks bad. If each logic is in separated classes it looks easy. That’s what we want.
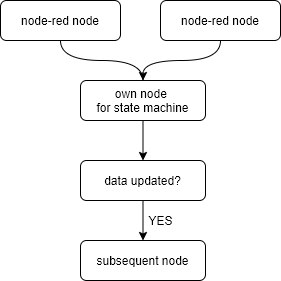
I need to explain about precondition a bit. As I told at the beginning, this class works on Node-RED. Our own node receives data from multiple nodes. Our own node computes the current state and sends it to subsequent node even if its state doesn’t change. It means that it sends the same state to subsequent node when it receives new data but it doesn’t have all required data. Therefore, next node needs to check whether the data is updated or not. If it is updated it passes through the next node. Next diagram shows it. I had our own node that check whether the value is update or not. That’s why I didn’t add the same logic in the new node. The two node-red nodes written in the following diagram read the data from the data source with the same polling rate. It means that our own node doesn’t receive the same item in a row. It receives item1 -> item2 -> item1 -> item2 -> …
Introducing state pattern
Okay, let’s improve the implementation above. Following class diagram is where we want to reach.
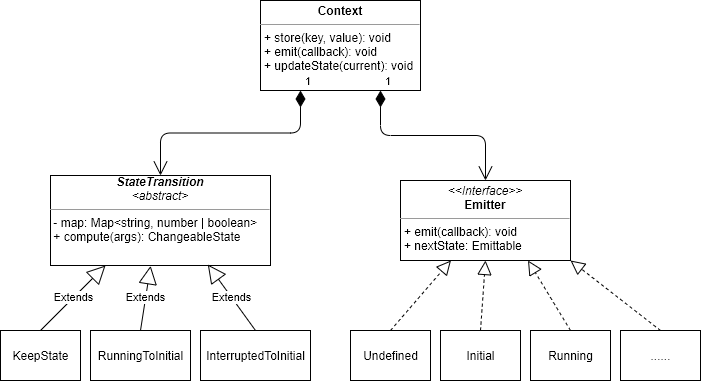
StateTransition is abstract class. It computes the current state. If it is not necessary to compute to determine the current state KeepState is used. It’s used in store function.
export interface ComputeArgs {
    key: string;
    value: number | boolean;
    count1: number;
}
export interface ChangeableState {
    emitter: Emitter;
    transition: StateTransition;
}
export abstract class StateTransition {
    protected map = new Map<string, number | boolean>();
    constructor(protected emitter: Emitter) { }
    abstract compute(args: ComputeArgs): ChangeableState;
}
Emitter interface provides a function to send state via callback. It’s used in emit function.
export type SenderCallback = (state: State) => void;
export interface Emitter {
    emit(callback: SenderCallback): void;
    nextState: Emitter;
}
Emitter has nextState because we don’t want to send incorrect state when it receives new data from other node while emitter waits for timeout in order to send next state. It can’t handle the data if the node receives new data when the state is Ended for example.
Let’s check the actual implementation for Emitter first because it’s easy. Undefined class is simple enough.
export class Undefined implements Emitter {
    public emit(callback: SenderCallback): void {
        callback(State.Undefined);
    }
    public get nextState(): Emitter {
        return this;
    }
}
I don’t show Initial, Running and Interrupted classes because they are basically the same as Undefined class. Difference is only state value. this is returned in nextState function because it’s not necessary to change the state.
Aborted, Ended and DummyRunning classes are a little bit different from the one above because it needs to send the next state without trigger after certain time is elapsed.
export class Aborted implements Emitter {
    public emit(callback: SenderCallback): void {
        callback(State.Aborted);
        setTimeout(() => {
            callback(State.Initial);
        }, interval);
    }
    public get nextState(): Emitter {
        return new Initial();
    }
}

export class Ended implements Emitter {
    public emit(callback: SenderCallback): void {
        callback(State.Ended);
        setTimeout(() => {
            callback(State.Initial);
        }, interval);
    }
    public get nextState(): Emitter {
        return new Initial();
    }
}

export class DummyRunning implements Emitter {
    public emit(callback: SenderCallback): void {
        callback(State.Running);
        setTimeout(() => {
            callback(State.Ended);
            setTimeout(() => {
                callback(State.Initial);
            }, interval);
        }, interval);
    }
    public get nextState(): Emitter {
        return new Initial();
    }
}
DummyRunning has two setTimeout functions because it needs to make two transitions. Since all 3 classes need to reach Initial state Initial class is returned in nextState. We can have very simple emit function by this refactoring. Following is the emit function. It’s very simple!!
public emit(callback: SenderCallback) {
    this.emitter.emit(callback);
    this.emitter = this.emitter.nextState;
}
Let’s see the StateTransition implementation next. KeepState class is simple and there is no logic.
export class KeepState extends StateTransition {
    public compute(args: ComputeArgs): ChangeableState {
        return {
            emitter: this.emitter,
            transition: this,
        };
    }
}
It just assigns objects which are currently used. Let’s see RunningToInitial class and InterruptedToInitial class at the same time.
export class RunningToInitial extends StateTransition {
    public compute(args: ComputeArgs): ChangeableState {
        this.map.set(args.key, args.value);

        const count2 = this.map.get(Key.Count2);
        const count3 = this.map.get(Key.Count3);
        if (count2 === undefined ||
            count3 === undefined
        ) {
            return {
                emitter: new Undefined(),
                transition: this,
            };
        }

        const isEnded = (args.count1 === count2)
            && (count3 === 0);
        const emitter = isEnded ? new Ended() : new Aborted();
        return {
            emitter: emitter,
            transition: new KeepState(emitter.nextState),
        };
    }
}

export class InterruptedToInitial extends StateTransition {
    public compute(args: ComputeArgs): ChangeableState {
        this.map.set(args.key, args.value);

        const count2 = this.map.get(Key.Count2);
        const flag = this.map.get(Key.Flag);
        if (count2 === undefined ||
            flag === undefined
        ) {
            return {
                emitter: new Undefined(),
                transition: this,
            };
        }

        const isDummyRunning = (args.count1 === count2)
            && (flag === false);
        const emitter = isDummyRunning ?
            new DummyRunning() : new Aborted();
        return {
            emitter: emitter,
            transition: new KeepState(emitter.nextState),
        };
    }
}
Used variables are a bit different but the two functions are basically the same implementation. It’s now clear which data are needed for which state although those data were mixed in the previous implantation.
We can rewrite the store function easily with this class.
public store(key: string, value: number | boolean) {
    if (this.isCount1Updatable && key === Key.Count1) {
        this.count1 = value as number;
    }
    const result = this.transition.compute({
        count1: this.count1,
        key,
        value,
    });
    this.emitter = result.emitter;
    this.transition = result.transition;
}
Big if-else clauses have gone somewhere. Additionally, we could remove map variable. When the state changes map instance is newly created in the class, so this class no longer need it.
Let’s see the updateState function again. It doesn’t change so much. emitter: State and currentState: State were replaced with emitter: Emitter and transition: StateTransition respectively.
public updateState(current: State): void {
    if (!this.lastState) {
        this.lastState = current;
        this.isCount1Updatable = true;
        this.emitter = getInitialEmitter();
        this.transition = new KeepState(this.emitter);
        return;
    }

    this.isCount1Updatable = false;

    if (this.isInitialToRunning(current)) {
        this.lastState = current;
        this.isCount1Updatable = true;
        this.emitter = new Running();
        this.transition = new KeepState(this.emitter);
        return;
    }
    if (this.isRunningToInterrupted(current)) {
        this.lastState = current;
        this.emitter = new Interrupted();
        this.transition = new KeepState(this.emitter);
        return;
    }
    if (this.isInterruptedToRunning(current)) {
        this.lastState = current;
        this.emitter = new Running();
        this.transition = new KeepState(this.emitter);
        return;
    }
    if (this.isRunningToInitial(current)) {
        this.lastState = current;
        this.emitter = new Undefined();
        this.transition = new RunningToInitial(this.emitter);
        return;
    }
    if (this.isInterruptedToInitial(current)) {
        this.lastState = current;
        this.emitter = new Undefined();
        this.transition = new InterruptedToInitial(this.emitter);
        return;
    }

    function getInitialEmitter() {
        if (current === State.Initial) {
            return new Initial();
        }
        if (current === State.Running) {
            return new Running();
        }
        if (current === State.Interrupted) {
            return new Interrupted();
        }
        throw new Error(`Undefined state: ${current}`);
    }
}
Thought for the further refactoring
store function still has isCount1Updatable variable. It needs to be updated when the state changes from Initial to Running. I had tried to remove the variable but I didn’t come up with a good idea for it then. I stopped the refactoring because current implementation is good enough and well separated.
Overview
In the first implementation, one class handles everything and is not so readable because it has many if-else clauses. On the other hand, refactored code has less if-else clauses and is readable. It’s because refactored code is more abstracted. When we want to know something new we want to know the overview first and then the detail. The same way should be applied to our programs. Higher level functions should have abstracted functions to show what the function does. The detailed logic should be written in lower level function. In this way, other developers can easily follow the code.

Comments